Remarks from the translator:
Dear ladies! This pattern will be a little unusual.
Firstly, this is a blog entry by Russian amigurumi designer Anya Kirdyasheva
(Аня Кирдяшева) https://www.livemaster.ru/topic/1396195-vyazhem-grelku-na-chajnik-skazochnyj-domik-chast-1
Out of respect for the author, I translate not only the pattern, but everything written by the author.
Secondly, you have to be creative in the process. Your teapot, of course, does not
coincide in size and shape with the author's teapot, so you will need to independently
refine the pattern of the house basic part.
I think you will agree with me that a little bit we all are children in our soul. I really love fairy tales.
I love to watch, to read, and ... to make them. But since as well I am quite a practical person (in any
case, I try to be like that), I love to combine a fairy tale and everyday life. Maybe you too will create
a piece of a practical fairy tale by crocheting a tea cosy “Fairytale House”. Such a creation will keep
the warmth of tea, will cheer you up, will become a real decoration of your kitchen. And of course,
this is a wonderful gift for your family and friends.
As in my previous patterns of tea cosies, I defined the complexity of the work as average. All your
teapots have different shapes and sizes. In the process of the work, you will have to experimentally
determine the number of increases and rows.
Another difficulty is that there are a lot of small parts on the tea cosy that are best made from thin
yarn. Therefore, in order to crochet and sew all this beauty on, it will take quite a lot of time and
patience.
But it is precisely these details that will make your tale house one and only.
Materials:
- yarn of different colors and thickness;
- black yarn for windows;
- brown yarn for the door;
- thin yarn (cotton is best suited “iris”, “daisy”, “coco”, “rose” - about 350-450 m/ 50g) for decorative flowers and leaves;
- beads, half-beads, sequins and the like for finishing;
- wire and two beads for the eyes of a snail;
- filler for the snail body;
Read more about yarn in the text below.
- glue "Crystal moment" or other universal transparent glue;
- monofilament or thin thread in the color of the yarn (it is convenient to use mouline
- of different colors).
Optional:
- acrylic paints;
- charms (metal pendants in the form of a lock, key, teapot).
Instruments:
- crochet hooks;
- sewing needles;
- yarn needle;
- brushes for acrylic paints.
Abbreviations and terms:
sc – single crochet
ch – chain\s
hdc - half double crochet
dc - double crochet
trc - triple crochet
inc - increase, make 2 sc in 1 stitch of the previous row
dec – decrease, crochet 2 next sc together
sl st – slip stitch
picot - see https://youtu.be/xzKt7ZW8668
FLO - work in front loops only
BLO - work in back loops only
* - repeat the specified number of times
sk st - skip stitch\s
The number at the end of each row indicates how many stitches (loops) there should be in this row.
All parts are made in spiral rounds, unless otherwise specified.
Acrylic, wool mixture or wool yarn of medium thickness is best suited for the basic house part.
I crochet the basic house of Alize ecolana yarn (100% wool, 220 m / 100 g), Alize lanagold
(wool mixture, 240 m / 100 g), Alize fine (wool mixture, 390 m / 100 g), Alize softy yarn
(100% micro polyester, 115 m/ 50 g) in 2-ply. - (in short, all remains of your previous projects)
The larger the teapot and, accordingly, the larger the tea cosy, the thicker yarn must be taken
so that the tea cosy holds its shape well.
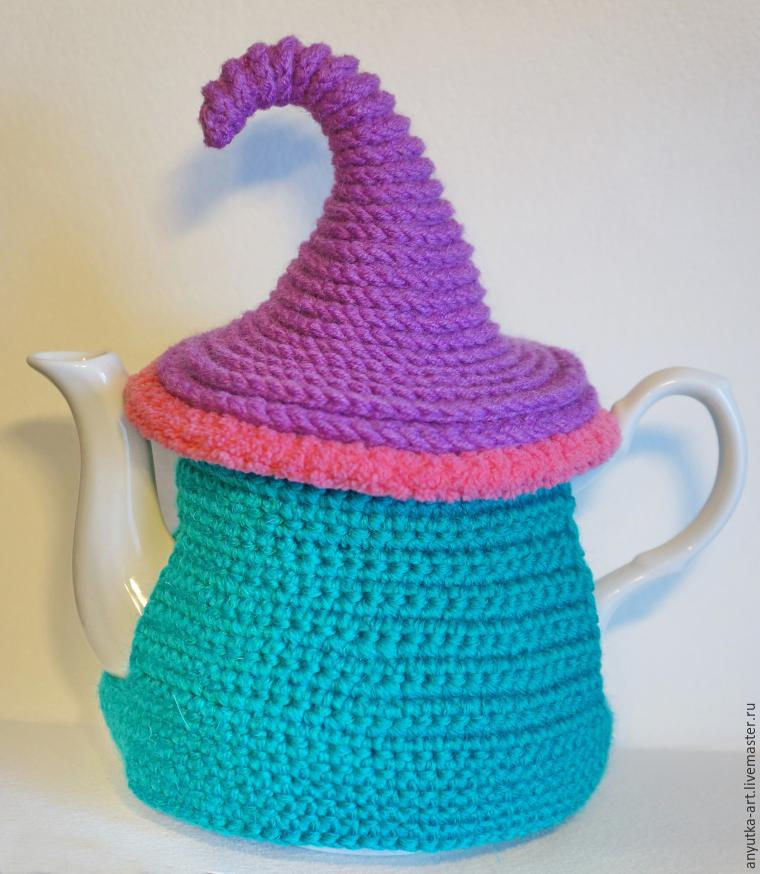
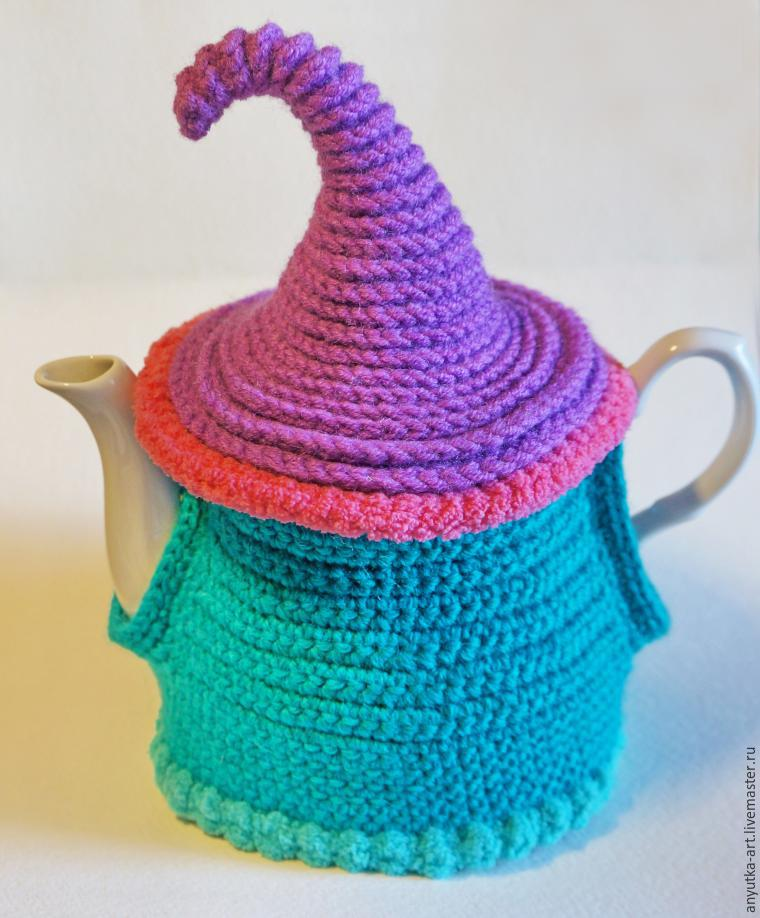
I will crochet a tea cosy for such a teapot.

Roof
Attention! We work in back loops only.
1 round) make 6 sc in a magic ring (6)
2) 5 sc, 1 inc (7)
3) sc around (7)
4) 3 sc, 1 inc, 3 sc (8)
5) sc around (8)
6) 7 sc, 1 inc (9)
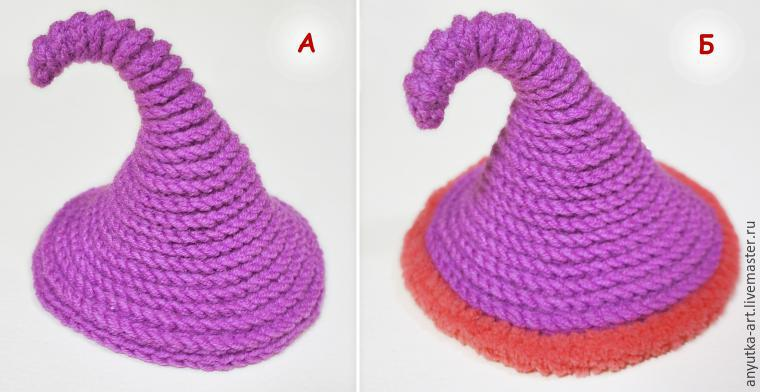
Next, crochet several rounds, making one increase in each row. The number of rows depends
on what height you want to make for the roof. The photo shows what height of my tea cosy
turned out after I made 12 rounds (photo A).
Then we crochet, making two increases in a round, three increases and so on (photo Б and the explanation below).
In the process try on the roof to your teapot.
And now, our roof has become like a wizard's hat and completely covers the teapot lid (in my case, also the sides).
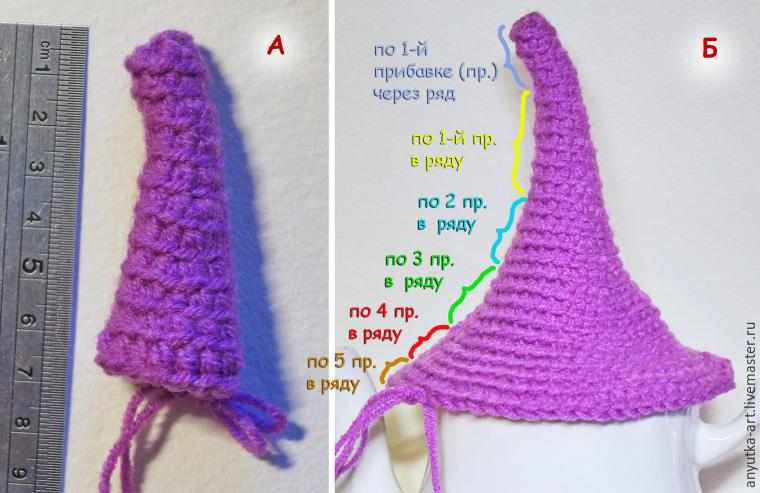
Explanation to the picture Б ( from the top to the bottom):
- the upper blue bracket shows the first 6 rounds,
- the yellow bracket - rounds with 1 increase in each one;
- the light blue bracket - rounds with 2 inc in each one;
- the green bracket - rounds with 3 inc in each one;
- the red bracket - rounds with 4 inc in each one;
- the brown bracket - rounds with 5 inc in each one.
Now we crochet, making six increases in each round, forming the fields of the hat (I forgot
to take a picture, but the following photos show what happens in the end).
Do not get carried away too much! Fields should not cover the spout and interfere to hold
the handle!
Finish crocheting with a slip stitch. Do not cut the thread.
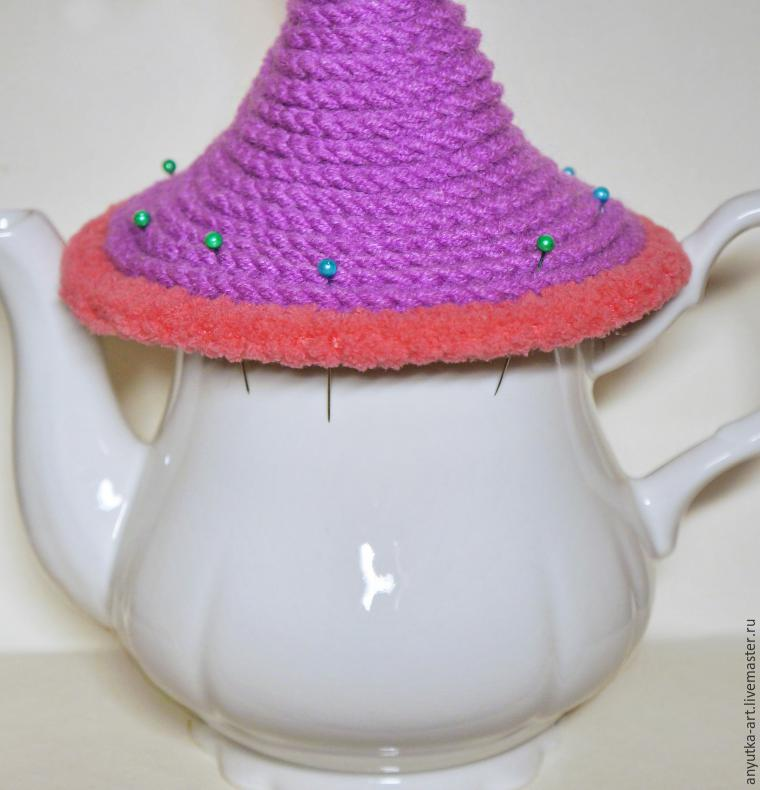
We get the ribbed roof due to the uncrocheted (free) front loops of the stitches.
Turn the crochet and make slip stitch spiral rounds along the same uncrocheted front loops,
moving to the top of the roof (photo A-B below).
Cut the yarn, leave a long tail.
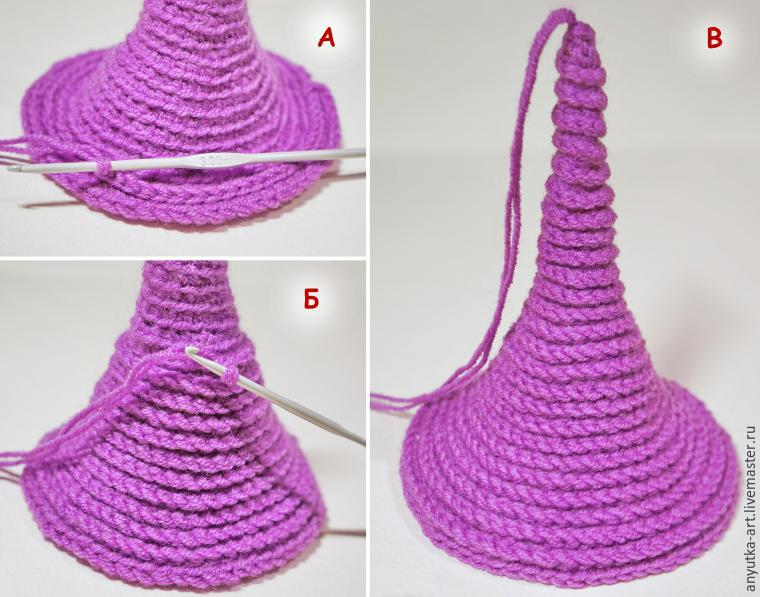
Sew across the rounds in the direction of the roof edge.
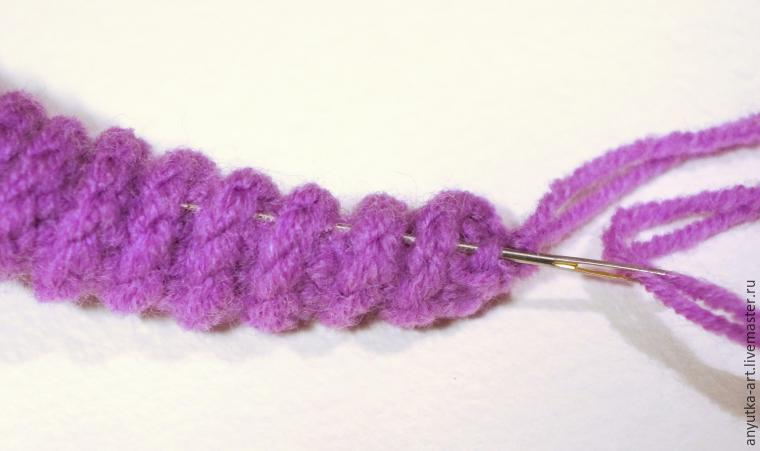
Tighten slightly in order to bend the top, fasten off the yarn tail on the wrong side with a knot (photo A).
Crochet with another color yarn along the edge of the roof. I made sc-round, using Alize
softy yarn (see above) in 2-ply (photo Б).
The roof is ready!
House basic part
1) Put the roof on the teapot and mark with pins the line where the roof touches to the teapot.
2) Turn the part with the wrong side up, crochet a slip stitch round along the marked line
. Use the roof yarn (this round made with grey yarn here for visibility only).
If you have crocheted the roof in 2-ply yarn, make this round in 1-ply yarn.

3) Add another yarn (your house wall color) and crochet sc-round along the slip stitch round.

Then work in spiral rounds, if necessary, make increases evenly. Try on the part to your teapot.
Work this way until the level of the teapot handle. Leave a few free stitches opposite the handle,
then work in back-and-forth rows, continue making increases in the right places.
Work this way until the level of the teapot spout. Leave a few free stitches opposite the teapot spout.
Next, crochet two separate side parts in back-and-forth rows.
When making the first side part, you should record the pattern (the row numbers and the
increases/decreases you made), in order to crochet the second side part the same way.

When crocheting, often try on your tea cosy to the teapot and adjust the number of increases
according to the shape of your teapot.

4) When both halves of the tea cosy are ready, connect them with chains under the spout (photo A)
and under the handle (photo Б).
The shape of this teapot allows to crochet the basic house part without a button at the bottom. But,
nevertheless, I made the hole for the handle large enough so that the tea cosy could be removed
and put on without problems.
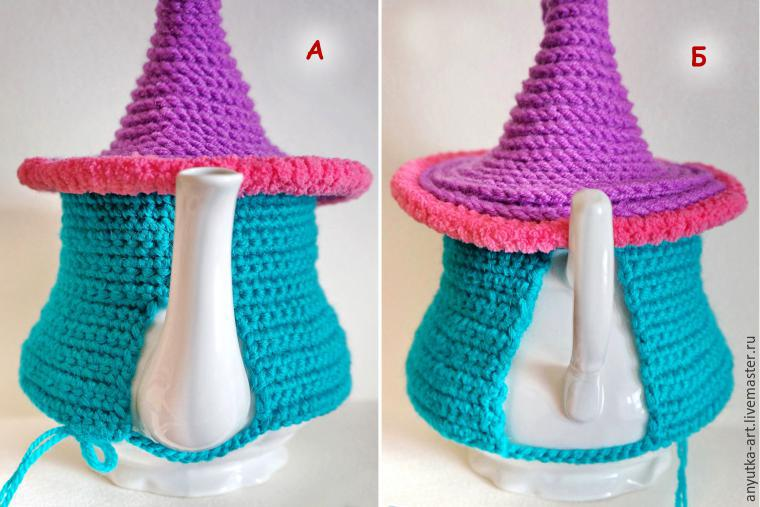
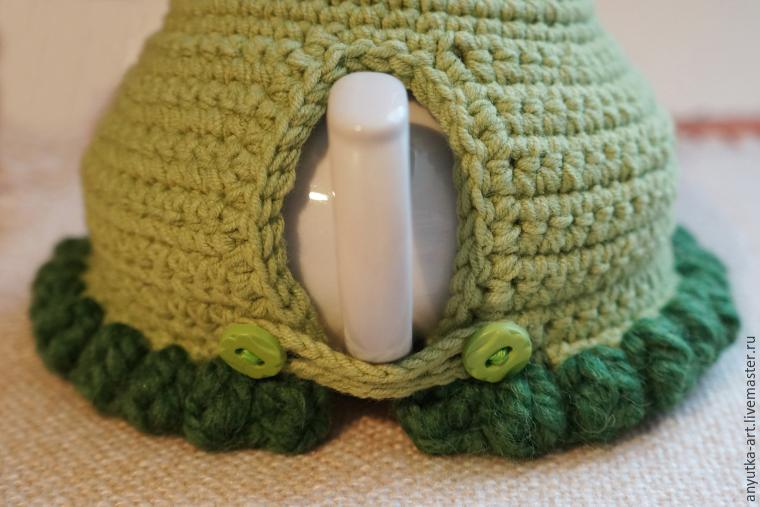
If you want you can make your tea cosy with a fastener under the handle, like the photo below.
5) Now work in spiral rounds. Stop for 0.5-1.0 cm to the teapot bottom.
6) Crochet along the last round with fluffy yarn. I used Alize softy yarn (see above).
Make 1 sc in the 1st stitch, then repeat [1 puff stitch (of 3-5 dc), 1 ch, 1 sc]* to the end.
7) Crochet 2-3 sc-rounds around the handle and the teapot spout. Finish with a slip stitch round or
a reverse single crochet round.

The house basic part is ready!
Now it’s worth putting the tea cosy on your teapot, moisturizing and letting it to dry completely
to give it the exact shape of the teapot.
The end of the part 1
No comments:
Post a Comment