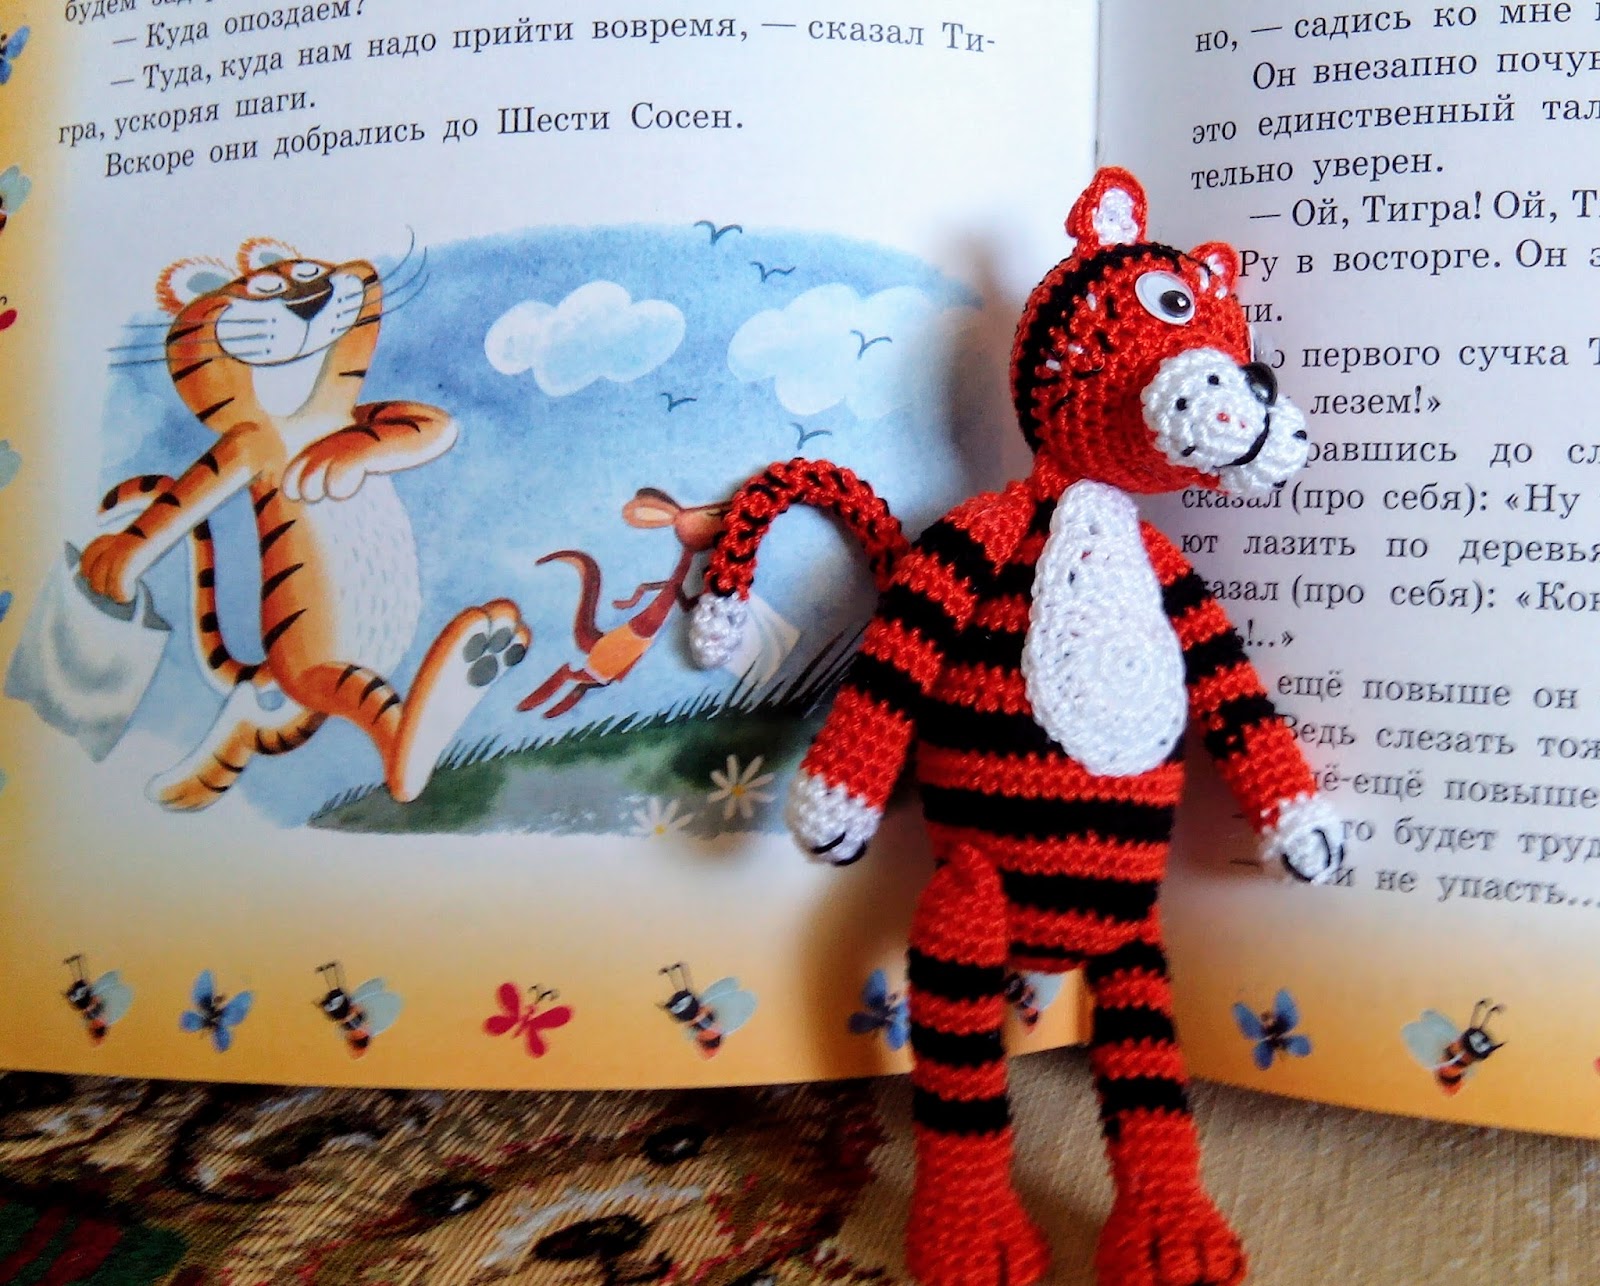
The Tiger was one of my first crocheted toys. Of course, it’s not a perfect creation and need some ‘up-grade’ :-)
Body
start with orange yarn, make black stripes width of 2 rounds
- 6 sc in magic ring
- inc around (12)
- [inc, sc] around (18)
- [inc, 2 sc] around (24)
- sc around (24)
- [inc, 3 sc] around (30)
7-8 (2 rounds altogether): sc around (30)
9. [inc, 4 sc] around (36)
10-11 : sc around (36)
12: [inc, 5 sc] around (42)
13-16 (4 rounds altogether): sc around (42)
17: [dec, sc] around (36)
18. sc around (36)
19. [dec, 4 sc] around (30)
20-22 (3 rounds altogether): sc around (30)
23. [dec, 3 sc] around (24)
24-26 (3 rounds altogether): sc around (24)
27. [dec, 2 sc] around (18)
28-29 (2 rounds altogether): sc around (18)
stuff with filler well
30. [dec, sc] around (12)
Leave a long tail for sewing the Head
Head
begin with orange
- 6 sc in magic ring
- inc around (12)
- [inc, sc] around (18)
- [inc, 2 sc] around (24)
- sc around (24)
- [inc, 3 sc] around (30)
- sc around (30)
- [inc, 4 sc] around (36)
- sc around (36)
Make 2 black stripes
10 - 11 (with black yarn): sc around (36)
make 2 rounds with orange yarn
12. sc around (36)
13. [dec, 4 sc] around (30)
make 2 rounds with black yarn
14. sc around (30)
15. [dec, 3 sc] around (24)
finish with orange yarn
16. [dec, 2 sc] around (18)
stuff well
17. [dec, sc] around (12)
18. dec around (6)
Cut off the thread, pull its tail through the stitches of the last round, pull well to close the hole, hide the tail inside the Head
Sew the Body and the Head using the Body thread tail (see the photo: the orange part of the Head is ‘the face’ of the toy)
Snout
with white yarn
6 ch st.
- (in the 2nd from the hook): 4 sc, 3 sc in the last st., 3 sc, inc (12)
- inc, 3 sc, 3 inc, 3 sc, 2 inc (18)
- [inc, sc], 3 sc, [inc, sc]*3, 3 sc, [inc, sc]*2 (24)
- sc around (24)
Attach the eyes onto the Head
Attach the nose onto the Snout
Stuff and sew the Snout
Ears, 2 pieces
The ear consist of 2 details: inner white and outer orange one
The White Detail
make 6 sc in magic ring, finish with sl st. Leave a tail for sewing to the Orange Detail
The Orange Detail
- 6 sc in magic ring, ch, turn
- in the 2nd st.: sc, 2 inc, sc, sl st., ch, turn
- sl st, 2 sc, 2 inc, 2 sc
Leave a long tail for sewing to the head
Sew the White detail inside the Orange one. Sew both ears to the head.
Add some black and white little stitches around the Snout (and black points on the Snout) using a sewing needle
White Spot
- 6 sc in magic ring
- inc around (12)
- [inc, sc] around (18)
- [inc, 2 sc] around (24)
- 24 sc, hdc, dc, ch, turn
- 4 sc, hdc, dc, ch, turn
- 6 sc
Work to length you want. Make sc-row around the Spot.
Leave the long tail and sew the Spot to the Body
Arm, 2 pieces
begin with white
- 6 sc in magic ring
- inc around (12)
- (in back loop only): sc around (12)
- sc around (12)
stuff with filler in process
5 - 9 (orange): sc around (12)
10 - 11 (black) : sc around (12)
12 - 13 (orange) : sc around (12)
14-15 (black) : sc around (12)
16-17 (orange) : sc around (12)
18-19 (black) : sc around (12)
20-22 (orange) : sc around (12)
Leave a long tail for sewing
Leg, 2 pieces
- 6 sc in magic ring
- inc around (12)
- [inc, sc] around (18)
- sc around (18)
- (in back loops only): sc around (18)
In order to make Foot more stable, put a flat button inside the foot and sew it with beginning tail
6. sc around (18)
stuff in process
7. [dec, sc] around (12)
8 - 10: sc around (12)
11. inc, 5 sc, inc, 5 sc (14)
12 - 25: sc around (14)
put together the both side, make 6 sc into the opposite stitches (to close the hole).
Leave the tail for sewing to the Body
Tail
- 4 sc in magic ring
- inc, 3 sc (5)
3 and so on: sc around (5)
Sew the tail to the Body, embroider some black and white stripes on the Tail.
Embroider claws on the Legs and the Arms.
No comments:
Post a Comment