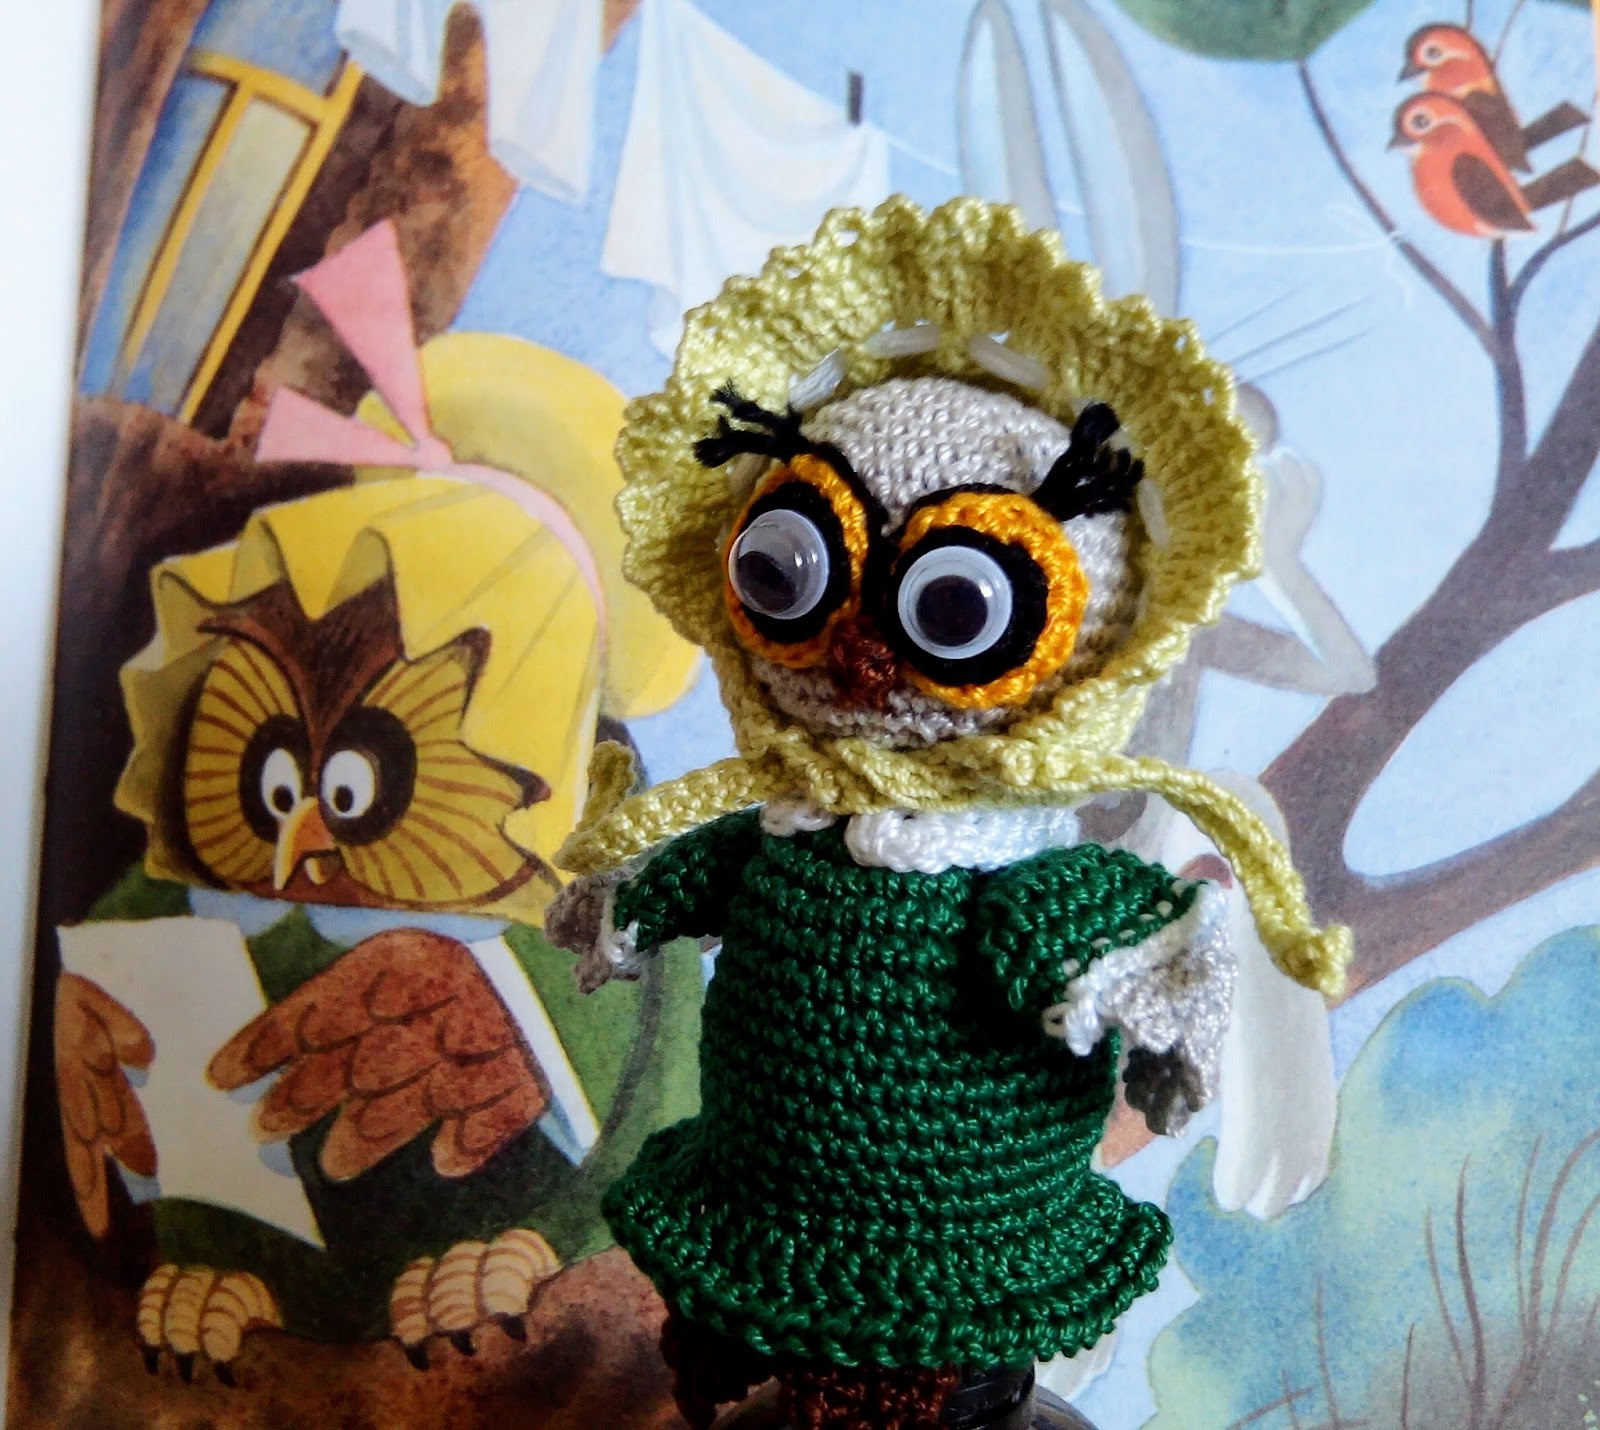
I continue introducing the characters of the book about Winnie the Pooh. Today I present my Owl.
It is made of cotton yarn (as always - acrylic yarn is good too) and has a yellow hat and a green dress with a white collar.

So, The Owl Crochet Pattern
Head
- 6 sc in magic ring
- inc around (12)
- [inc, sc] around (18)
- [inc, 2 sc] around (24)
- [inc, 3 sc] around (30)
- [inc, 4 sc] around (36)
7 - 14: sc around (36)
15. [dec, 4 sc] around (30)
16. [dec, 3 sc] around (24)
17. [dec, 2 sc] around (18)
stuff with filler
18. [dec, sc] around (12)
Leave a long tail for sewing to the body

Body - Dress
work with color of dress
begin from the neck of the toy
- 6 sc in magic ring
- inc around (12)
- [inc, sc] around (18)
- [inc, 2 sc] around (24)
- [inc, 3 sc] around (30)
- [inc, 4 sc] around (36)
7 - 18: sc around (36)
Don’t cut off the dress thread, but finish the body with the head yarn (grey).
19. (with grey, only in back loop of st.): sc around (36)
20. [dec, 4 sc] around (30)
21. [dec, 3 sc] around (24)
By the way, at this moment we can change the pattern (a little) to make a finger puppet option of the Owl. For detailed instruction see A little Hare finger puppet
So, continue finishing the Owl body (a toy option)
22. [dec, 2 sc] around (18)
stuff with filler
23. [dec, sc] around (12)
24. dec around (6)
Cut off the grey thread, pull the tail through the stitches of the last round and close the hole.
Make a dress frill into the front loops of the 18th round using the dress (green) thread
- sc around (36)
- [2 dc in one st.’, 3 dc] around
- [inc, sc] in each st. of the previous round
Sew the head to the body
Arm of the dress (sleeve), 2 pieces
Leave a long beginning tail for sewing to the body
- 6 sc in magic ring
- inc around (12)
- [inc, 3 sc] around (15)
4 - 6: sc around (15)
finish with white yarn
7. [sc, ch] in each st. of the previous round
Leave a long tail for sewing the Wing to the Arm
Wing, 2 pieces
work with grey (the head color)
make chain of 11 st.
- 10 sc, 3 sc in the last st., 7 sc, ch, turn
- 8 sc, 3 sc in the next st., 7 sc, ch, turn
- 7 sc, 3 sc in the next st., 6 sc, ch, turn
- 7 sc, finish with sl st.
Put the corner of the Wing into the Arm of dress and sew with the white tail of the Arm (see the photo above). Before sewing stuff the Arm with filler just a little. Sew the Arm to the body
White collar
Make basic chain and 3 rows of sc. Make increases at the end of rows. Try the collar onto the neck. Sew it to the body.
Paw, 2 pieces
- 6 sc in magic ring
- inc around (12)
3 - 5: sc around (12)
6. dec around (6)
7. 4 ch, sl st., 4 ch, sl st., 4 ch, sl st.,
Leave a long tail and sew the paw to the body
Hat in the old style
- 6 sc in magic ring
- inc around (12)
- [inc, sc] around (18)
- [inc, 2 sc] around (24)
- [inc, 3 sc] around (30)
6. 25 sc, ch, turn
7. 5 sc, inc, 6 sc, inc, 6 sc, inc, 5 sc, ch, turn
8. 5 sc, inc, 7 sc, inc, 7 sc, inc, 6 sc, ch, turn
9. 6 sc, inc, 8 sc, inc, 8 sc, inc, 6 sc, ch, turn
10. 6 sc,inc, 4 sc, inc, 9 sc, inc, 4 sc, inc, 7 sc, 2 ch, turn
11. dc, [ dc, ch, sk st.]*18, dc, 2 ch, turn
12. dc, 3 dc in each ch of the previous row, dc, ch, turn
13. [sc, 3 ch, sk st] around
Make sc along the bottom edge. Add chains for drawstrings.
Insert a narrow color ribbon through the stitches of the 11th row, pull it a little, sew on backside of hat.
No comments:
Post a Comment